Contact Us

Use the form on the right to contact us.

We respond to most emails within 24 hours.  

9642 Randle Rd
Williamsport, OH, 43164

Honeyrun Farm produces pure raw, honey, handcrafted soap, and beeswax candles in Williamsport, Ohio

Blog

Filtering by Tag: honey

How to Make Your Own Butter and Honey Butter

Honeyrun Farm

-posted by Jayne

We are often asked if we make and sell honey butter.  The answer is no... we do not.  But we do make our own butter from time to time, and adding honey to create honey butter is very simple.  If you own a food processor- making butter is very easy.  The most important ingredient... well the only ingredient is a high quality whipping cream.  I feel very fortunate to live in an area where we can get minimally processed milk and cream from grass fed cows.  Growing up on a dairy farm- I have always had a love of dairy cows and dairy products.  My favorite foods are cheese and real freshly whipped cream (confession- It's not honey!).  I seriously feel sorry for those who think that the only forms of whipped cream are Cool Whip and Redi-Whip.  How sad!  

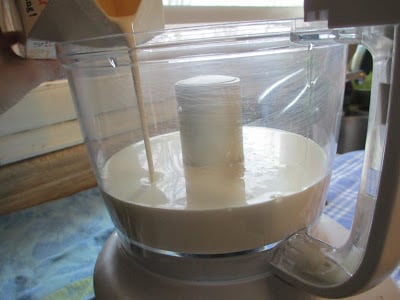
Now let's whip some real cream.
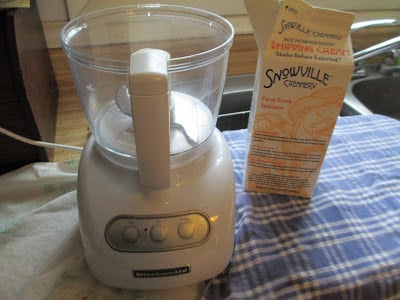
Two necessities for butter:  agitator (food processor) and whipping cream


 Step 1.  Fill your food processor about 1/3 to 1/2 full of whipping cream (no more).


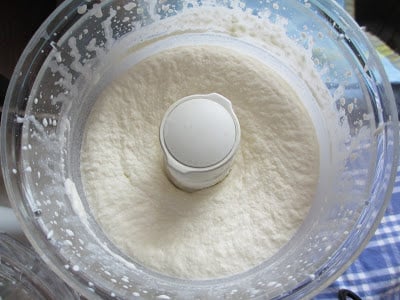
Step 2.  Turn on your food processor (lid on, of course) until the mixture resembles a glossy, creamy state.  This, my friends, is freshly whipped cream.  If I'm not making butter I  usually like to stop right here, add a few Tablespoons of sugar, and enjoy a healthy spoonful of whipped cream.  I freeze it in dollops on a baking sheet and store it in containers in the freezer for use on hot chocolate or in homemade mocha drinks.  But today we'll move past this stage on to butter making.


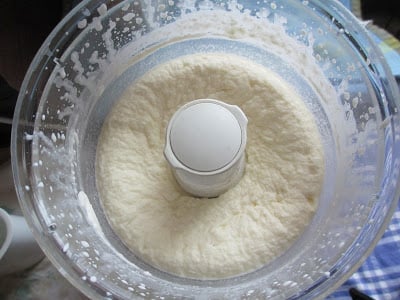
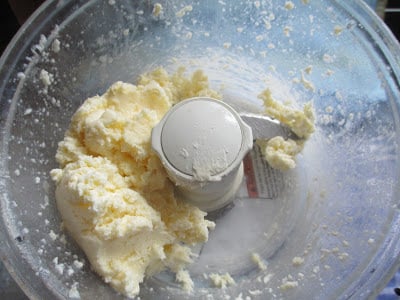
Step 3.  Keep the food processor churning.  You will notice the glossy whipped cream state moving to a ricotta type texture (not quite as thick as ricotta-but the same look).  You can stop and admire the change for a bit... but you must keep churning if you want butter.


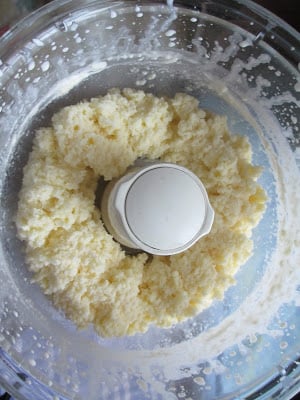
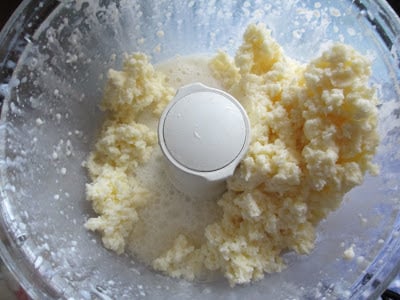
Step 4.  Keep it churning.  Here you see it starting to separate just a bit.  It's only been churning for 2-3 minutes at this point.


Step 5:  Wah-la!  Here it is starting to solidify.  The color is turning a creamy yellow color, and the buttermilk is starting to separate off from the butter.  Have you noticed we have done nothing more than click a button and observe the changes?  Food processors are amazing!


Step 6:  Here you can really see the buttermilk separating.  Now we actually get to do something.  Remove the blade from your food processor and pour off the buttermilk into a dish (NOT down the drain!  Save that good stuff!)  You will put the food processor back together and continue to pulse the mixture until more buttermilk separates.  Continue to pour it off, about 2-3 times.

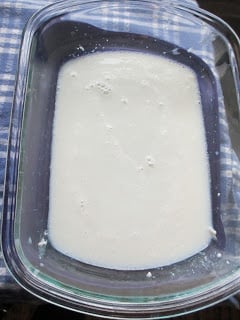
Here is the buttermilk- ready to use in biscuits or baking.
 Step 7: Now you are almost done... but there is still a little bit of buttermilk left in the butter.  Remove your blade, and really wash your hands, because they are going to get dirty.  Remove your wedding ring or anything else you don't want to get slimy.  Squeeze the butter to remove excess buttermilk.


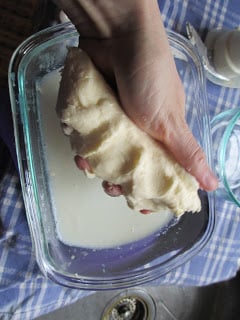
Step 7:  You still need to wash your butter.  Get your tap water running very cold.  Hold your butter under the running water and squeeze as the cold water washes through it.  You are washing out any excess buttermilk that is left.  I read somewhere that if you don't get it all out, it can cause your butter to spoil prematurely.  Just keep massaging and moving the butter under the water until you notice it is not releasing any moisture.  It will be soft and pliable, and not overly sticky.
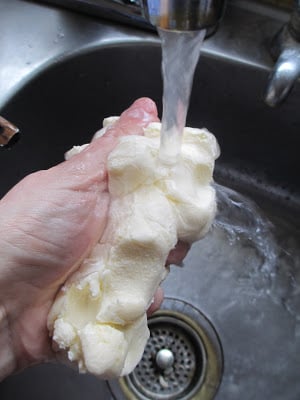
Wash that butter.
 Step 8:  When there is no liquid left in the butter, you can shape it in to your desired shape, or.... you can add honey to make honey butter.


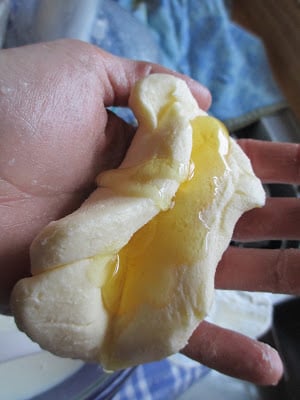
Step 7:  Simply squeeze a generous amount of honey over top your butter, and squeeze it until it is completely combined.  It really is that simple!  Re-shape your honey butter, and store it in a container in the refrigerator.  I have kept mine over two weeks... I imagine if you use good quality fresh cream, it will last much longer.

Please feel free to ask any questions if anything in the directions isn't clear.  The whole process is really quite simple and straightforward.  I know I am being redundant here... but using a local, high quality cream will make all the difference in the ease of your butter making, as well as the flavor quality.  Enjoy!

Honey Sweetened Eggnog

Honeyrun Farm

We've been enjoying eggnog around here on a daily basis, which proves that you really don't have to be throwing a Holiday party to partake in this wonderful indulgent drink.  I searched all the eggnog cartons at our local Kroger and could not find one that didn't have corn syrup or high fructose corn syrup as an ingredient.  So why not make it ourselves?  We have a plentiful supply of farm fresh eggs, as well as honey, so why not a honey sweetened eggnog?  I found a recipe on pinterest that looked good, and changed the method of cooking the eggs so that I can assure we are safe from Salmonella.  I use a similar method to the one I use when cooking the eggs and milk for homemade ice cream.  Very simple, and great results!  

Here's what you need:

3 cups milk
2 eggs, plus 1 yolk
Pinch of salt
1/4 cup honey (or more if you like it sweeter!)
1 tsp cornstarch
3/4 tsp nutmeg
1/2 tsp vanilla extract

Optional:
Cloves, Vanilla Bean, Cinnamon

Directions:  Whisk together the 2 eggs, plus 1 yolk and the 1 tsp. cornstarch.  In a saucepan, combine 1 and a 1/2 cups of milk with this mixture, heating over medium heat.  Monitor your heat temperature with a thermometer, stirring constantly until it reaches a temp of 160 degrees.  This will destroy any Salmonella bacteria, and will allow the mixture to firmly coat a metal spoon.  

Remove the saucepan from heat and allow to cool, until around 100 degrees.  At this time, add the honey, nutmeg, vanilla extract, and if you would like, add a vanilla bean, cinnamon sticks, cloves, and any other spices you might enjoy.  If you don't have any of those on hand, the nutmeg is really all you need, in my opinion.

Allow the spices to "marry" the rest of the ingredients, then add the rest of the milk (1.5 cups) and your eggnog is ready to enjoy!  It can be enjoyed warm or cold.  We prefer it cold, so I usually place it in the fridge overnight, and the next day it is ready to go.  No alcohol needed for me, but of course you can enjoy it with a bit of rum or bourbon if you like.


More questions answered: Creamed Honey and Honey Sticks

Honeyrun Farm

-Posted by Jayne

Our give-a-way last week has provided a lot of great ideas for blog posts.  We've decided to answer a few questions here and there, rather than writing a book in one long blog post.  Here are a few more of the "easy" ones that I can answer.  I'm going to leave the more technical beekeeping questions for Isaac.

Ianna writes, "I've tried and loved all sorts of liquid honey, but only just recently just tried (aka devoured) some opaque, buttery honey. It wasn't crystallised, it was just buttery smooooth! How is that made? What's the difference (outside the obvious :) between that opaque buttery honey and liquid honey?"

Good question!  I believe what you are refering to is "Creamed Honey."  There is also a product called "Honey Butter" which is butter mixed with honey, but it sounds more like you had Creamed Honey.  This product is very similar to our "Naturally Granulated Honey," but very different in one regard.  Creamed honey is made by using a "seed" which is really just another creamed honey that has a specific type of smooth granulation.  All honey will granulate, but depending on the type of honey (what nectar it is from), it has different sizes of granules.  Here you see some lighter early Summer honey with a pretty fine granulation:
 And here you see some late Summer honey that has not quite granulated completely.  It is still a bit more runny and smooth.  We have sold both as "Naturally Granulated Honey," since we don't do anything to it... just let the honey sit and get more creamy and solid.  BUT.. if we were to make creamed honey, we would start with about a pound of the "seed" honey, and add it to about 12 lbs. of liquid honey, and mix it in our Kitchenaid Mixer for about 5 minutes.  Then, you put it in your jars and store it at a temp of about 56 degrees for a week or so.  Wah-la!  Creamed honey!  If you wanted to try this yourself, you can google "How to make creamed honey" and come up with similar recipes.
Come to think of it... that would make a wonderful Christmas present!  Buy a large jug of honey, a pound of creamed honey, and you can make your friends and family a wonderful "homemade" gift!

And one more question for today.  
Jen asks, "Is it easy to make honey sticks?"


It would be fun to tell you we use a little dropper to
get the honey in the stick... but I don't think it would be
very believeable!
Actually, yes it is!  For us, at least....
We don't actually put the honey into the little stick ourselves.  This requires a machine that costs about $18,000 dollars (or so we've heard).  We have found a company that allows us to send them our honey, and they put it in the little sticks for us (for a fee, of course).  We know other beekeepers who just buy the sticks from the company and re-sell them, but we are really proud to have our own honey in the sticks, so we actually feel it is worth it to send our honey to them so we can have our own Honeyrun Farm honey sticks.  So aside from lifting a 60 lb. bucket onto the counter at the post office, the task is really pretty easy.  Who am I kidding, I always make our post master Ron lift the bucket for me.  Thanks Ron.  

If you'd like to come see us this weekend, we are selling at the Worthington Winter Market on Saturday from 10-1, and at the North Market Holiday Show from 8-5 on Saturday and from 12-5 on Sunday.  Have a wonderful weekend!

Fall Honey and Random Business

Honeyrun Farm

-Posted By Isaac

Back from Big Sky Country and we seem to be firing on all cylinders. I can't help but wish the engine was bigger though... after seeing some of the commercial beekeeping out there!

I guess the most relevant thing going on is the goldenrod/ aster honey. I've spent this somewhat cold week pulling honey and feeding bees in the gorgeous October sunshine. You really can't beat Fall beekeeping.  It's beautiful out, there is a bit less honey so the pace is not as frantic, and you rarely sweat clear through your shirt and jeans like in the middle of July.

 You can see the brilliant orange/ yellow comb made when the bees are on goldenrod.

I pulled about 2000 pounds this week and we'll cross our fingers for another 2000 lbs or so in the weeks to come.

Our worker Ryan stays busy in the honey house.
(At least while I'm looking.)
 The goldenrod bloom is pretty much over but the white aster has come on strong this year. This gives the Fall honey a distinct minty taste that mixes with the mellow butterscotch taste of the goldenrod.
White Aster
Other random business:
 A week ago Dan Williams, our bee club president tipped me off about a big beekeeper up north who had a bunch of boxes for sale.
I, of course, couldn't pass up a good deal...
So now we have a barn full of winter work. Whew... what a relief. I wouldn't want to take it easy or anything!
"Daddy, just take the picture so I can go to school."

 On Sunday, Green Been Delivery had their customer appreciation lunch at Blendon Woods Metro Park. I served up cut-comb honey and talked bees.
Yum! Summer Comb.
 There was a lot of sword fighting, but no real injuries as far as I could tell.


On Wednesday, Jayne took up a rather large order for the Greener Grocer market bag. (Thanks, Colleen!) This program must be a real hit. Every time a market bag order comes it seems to have doubled in size.
Sorry Jayne, - blurred picture
 At some point this week we decided that the cold nights were just too cold. It was time to fire up the stove. Problem- a mischievous crawling little boy. I found some old barn wood and put together a Bridger keep-out fence. Now we're ready for winter.
Let's kick the tires'n light the fires, lil Bridge!
On a final note, Jayne and my sister Becky from Dangling Carrot Farm went over to my brother's house to watch the vice presidential debates last night. A reporter from NPR was there to do a story on our politically dysfunctional family. It hit the press this morning. I thought you might be interested.
Me... no, not interested. I put the kids to bed and extracted honey for another hour. Hey, somebody's got to keep this country running while you all debate.
Joe Six Pack needs his honey!

Not Just Another Color in the Crayola Box.

Honeyrun Farm

-posted by Jayne
My first recollection of the word "goldenrod" was describing a crayon.  It was always just another muted yellow in the crayon box.  Kind of a dull mustard color.  It wasn't until much later that I realized, the crayon color is describing a flower.  
So I dug out our crayon box and took a look.  Yep.. it's still there.  Still the same color.  But I'm not sure the color accurately depicts the actual flower.  The color changes as the season progresses.  It starts off as a dark greenish-yellow, then ripens to a vibrant bright yellow (seen below in the bright mid-day sun).
As the flower matures, it becomes the deep yellow color you see below, more like the actual color of the crayon.  Depending on the time of day, and how the sun is hitting it, the color of the flower can change drastically.  
This week we took the kids out for an evening hike, for the sole purpose of checking out the goldenrod.  I wanted to see what kind of pictures I could get as the sun was setting.
 I didn't do anything to these photos... no adjusting for color or anything.  This is what goldenrod really looks like when the sun is setting over the horizon, lighting up the flowers in such a beautiful way!


 The tiny white flowers you see interspersed with the goldenrod below are asters.  These are the next big nectar source for the bees.  They are just beginning to open.  Perfect timing.  Fall honey, primarily from goldenrod and asters, is deeply robust, with tones of butterscotch and mint.  I have been eating more Fall honey than anything else this year.  It has really grown on me!
As we approached the bee yard surrounded by this field of goldenrod... the smell was there.  While the bees are ripening the goldenrod nectar, it has a distinctly strong smell.  Some people think it smells like dirty laundry.  But I commented to Isaac... I don't really smell that anymore.  To me, it just smells like Fall honey.  And it smells pretty good.    Have a good weekend!